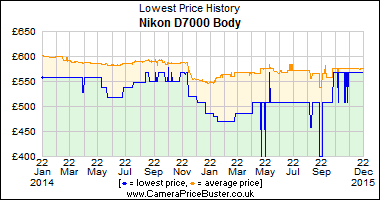
Recently a friend of mine bought a Nikon D7000 body, but he was unsure of what lenses to get, so I invited him over to try some of my gear. His needs were for a general purpose 'walk-round' zoom plus a 'proper' macro lens. Macro lenses aren't cheap, so we needed to squeeze the budget on the zoom. I had already dissuaded him from the Nikon 18-105mm 'kit' lens, reasoning that he could do better for less money by buying second-hand (the 18-105 is around £150 when bought with the camera).
It was an interesting exercise for me, affording me the opportunity to see all my lenses lined up and then re-assess what I like and don't like, and therefore what I need and don't need. I can see a bit of a lens cull coming up...
Anyway, back to the £100 of value, here's 3 ways to spend £100 on lenses for your Nikon, all of which are terrific value, but all in different ways:
Nikon 50mm f/1.8 AF-D
Humble and often overlooked, the current 50mm f/1.8 AF-D is a cracking little lens. Image quality wise, all you seem to lose here against the more expensive standards (I have a 50mm Ai-S f/1.2 as well) is performance below f/2.8 (at f/5.6-f/8 you'd have to be very picky and doing enormous prints to tell!). Bear in mind though, consumer zooms don't even go to f/2.8, so this lens is going to offer low-light capability that your 'do-it-all' zoom won't!
Admittedly construction is plasticky, the depth of field scale is pathetic as only f/11 and f/22 are shown - practically useless for digital. On the plus side it's very light, compact, focuses fast and works on FX and DX, and new can be bought for less than £100. We even spotted some mint second-hand examples from £60 - testament to how unfashionable these excellent optics are, as most people favour a zoom these days.
If you don't like the plastic, and can forego autofocus, a secondhand 50mm Ai f/1.8 or f/2 does the job for about £10 less, plus you get a proper depth of field scale.
Nikon 18-70mm AF-S G DX ED IF
This lens was offered up as a kit lens around the time of the D70, and in the context of consumer grade standard zooms is quite well regarded (see
here and
here). You're getting three ED glass elements, AF-S, a metal lens mount (18-105 has plastic) and a reasonable zoom range of 27-105mm. This latter point probably partly explains the better-than-expected optical performance, as there are less compromises to be made than a wider-ranging zoom. No depth-of-field scale at all though, and it is DX only.
Nikon made around 2.2 million of these over a period of about 5 years, and today these can be picked up in mint or excellent condition from dealers or ebay for around £100, and you shouldn't have to pay more than £120 for a boxed example with hood. As I explained to my friend, use it for a year or two, then sell it if you decide to upgrade, you will probably get back 80 to 100% of what you pay for it...
My friend was able to use the £50 saving to put towards a good used 105mm f/2.8 AF-D macro, it will be interesting to see how he feels the two lenses compare!
I was somewhat tempted by the 18-70 myself, but it doesn't really suit my style of shooting...but the next lens does.
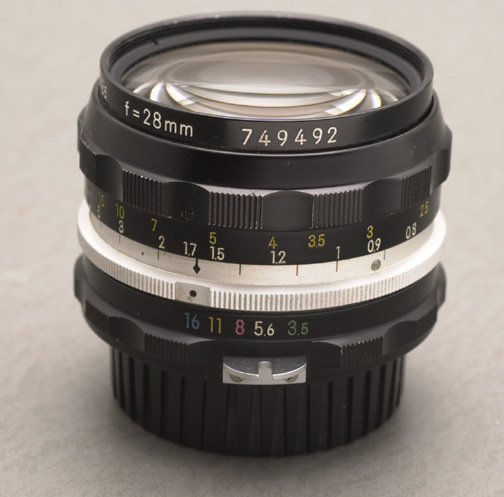
Nikkor 28mm f/3.5 H Auto (Ai converted)
This lens dates from the early 1970's, when Nikon only made expensive things, and made them out of metal. This lens has the lovely scalloped focus and aperture rings that not only feel good to use, but are very practical with gloves on. Focussing doesn't have quite the 'damped' feel of later Ai & AiS lenses however. By contrast to the 18-70 above, Nikon only made around 500,000 of these over a 23 year period (if you count all the variants of the f/3.5 lens that is).
Ok, I'll admit this isn't everyone's cup of tea, but as I was looking for a 'standard' lens for my D7000, this one came into mind. Manual focus down to only 60cm, it's quite slow and not 'native' Ai. But, despite all that metal, it is light, compact, has an excellent depth of field scale and apparently it's performance into the light is
fantastic - hopefully we'll get a few summer sunsets to try it on!
I quite like a slight wideness for a 'standard' lens (42mm on DX), and of course it will work on FX to (although that's not what I intend to use it for, as if I am lugging around a D3, I might as well lug a PC-E lens as well!).
Despite the age, it's relatively easy to find a good example, I got one in excellent condition that had a factory Ai conversion, for £100. This will complete my 3 lens 'hiking' landscape setup for the D7000: Tokina 11-16mm, Nikon 28mm, and Nikon 50mm (or 55mm macro if I decide to keep it!). The Tokina can be substituted for a 20mm when I want to go really light.